
In PrestaShop 1.7 the Modules and Services page is divided in three tabs to help you perform easily what you want to do regarding your modules:
- Selection: this is where you can discover and install new modules to improve your store, when you’re beginning or growing with PrestaShop,
- Installed Modules: where you can manage your modules on a daily basis
- Notifications: review modules notifications, when you need to take action (updates or configuration) to guarantee the good functioning of your modules
At the top of the page, you will also find two important features: the connection to Addons and the "Upload a module" option.
Quick links:
How to install a module
How to connect to Addons marketplace
How to configure an installed module
Module notifications
Below the page title, you will at times get notifications from installed modules. Most of the time, the notification help you complete the configuration of modules that are installed but are not yet ready to be used: updating their settings should make the notification disappear... and your module work properly.

When one of your module has an update available on the Addons site, PrestaShop will let you know about it, and an "Update all" button will appear at the top of the page. Click on this button to update them all.

Connecting to Addons
In the basic configuration, the modules' page will only let you update the default modules, the ones that were included in PrestaShop. If you have bought modules on Addons, the PrestaShop marketplace, and you want those to update automatically too, you have to connect your PrestaShop to Addons.
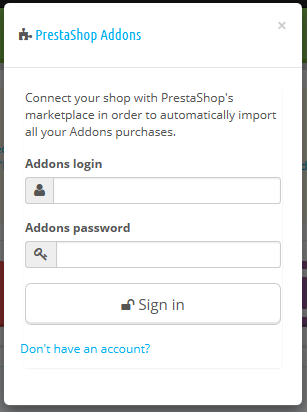
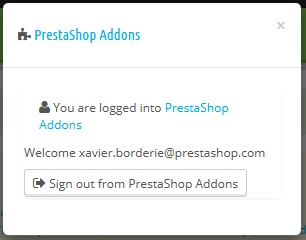
Click on the "Addons" link at the top of the screen: this will open a model window with a log in form. Simply fill in the form with your Addons connection details, and PrestaShop will now know (and update) the modules you have bought. Click on the "Addons" again, and it will display your account login.
 |  |
If the modules you have bought on Addons are not updating, do check that you are connected through this form!
Upload a module manually
Once you have downloaded a module from the Addons online shop to your computer, it is up to you have it installed on your PrestaShop site.
If you haven't linked you store to your Addons account, there are two ways to install a module: either using the dedicated form, or using your FTP client.
Installing using the dedicated form
To install a new PrestaShop module automatically, click on the "Upload a module" button at the top of the page. A pop-up window will open.

This block enables you to upload the archive file of the module, as downloaded from Addons. You can either upload a zip file, or a tar.gz one (tarball). Simply drop the module's file here, or browse to the file that you downloaded by clicking on "select file". Do not point to the module's uncompressed folder or any of its unpacked files: only the archive file!
Once the file is detected, the installation will start automatically: PrestaShop will upload the module from your computer to its server, unpack it, place the files in the correct location, and update the page, all this in a handful of seconds. PrestaShop will then display "Module downloaded successfully".
Modules are not installed by default: you still have to click the module's "Install" button, and then possibly configure its settings via the "Installed modules" tab.
Once configuration is complete, be sure to test the module immediately to confirm that it works as planned.
Installing using a FTP client
You can also choose to install a module by yourself, using a FTP client.
To install a new PrestaShop module manually:
- Unzip (decompress) the module archive file (
.ziportar.gz). This should result in a new folder. - Using your FTP client, connect to PrestaShop web server, and place the unpacked module folder in PrestaShop's
/modulesfolder.
Pay attention NOT to upload that folder in another module's folder (which can happen when drag-and-dropping items). Upload both the folder and the files it contains, not just the files. - Go to your back office, in the "Installed Modules" tab.
- Locate the new module in the modules list. You might have to scroll down; you can also use the list's search engine, which should give you a dynamically updated list of matching module names.
- In the row for the new module, click the "Install" button.
- Your module is now installed and should be activated too. If necessary, click on the module's "Configure" link. Also, pay attention to any warning message that might be displayed by PrestaShop.
Once configuration is complete, be sure to test the module immediately to confirm that it works as planned.
Modules can come from many sources, and not all of them are reliable. This is why PrestaShop may display a warning window for "Untrusted" modules – that is, modules that have not been verified by PrestaShop through its Addons marketplace. This screen window lets you choose whether to proceed with the installation with no further notification, or to stop the installation process.
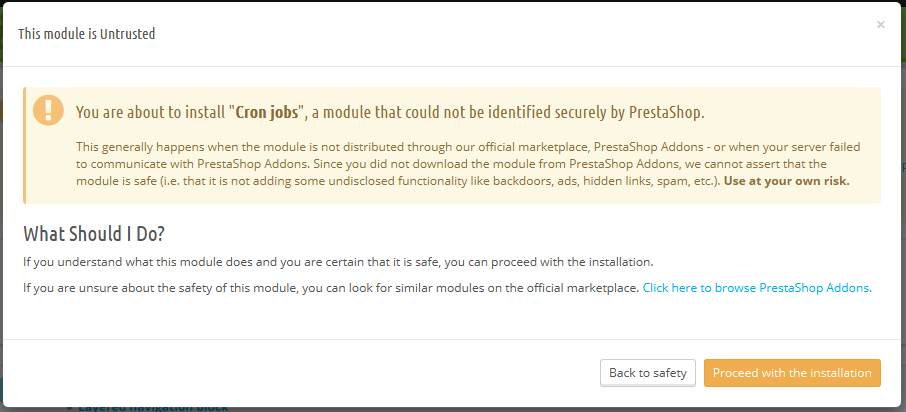
Installing a native module or a module obtained through Addons will not trigger the display of this window.
Connect to Addons Marketplace
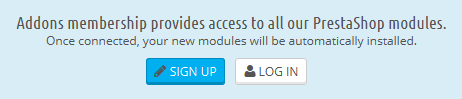
PrestaShop Addons is the central marketplace where you can get new modules and themes for your store. Addons users are first-class citizens when it comes to managing modules! Indeed, once you installation of PrestaShop is tied to your Addons account, the modules you get on Addons will automatically be imported installed and updated! This is why it is hightly recommended that you should link your store to your PrestaShop Addons account.
Don't have an Addons account?
Creating an account is free is easy. Click on the 'Connect to Addons marketplace" button, then click on the "Sign up now" link, which will take you here: https://addons.prestashop.com/en/login#createnow
From there you can create a new account and browse among all the modules and themes available on our Addons marketplace.
Already have an account?
If you already have an Addons account, click on the "Connect to Addons marketplace" button to open the login window.
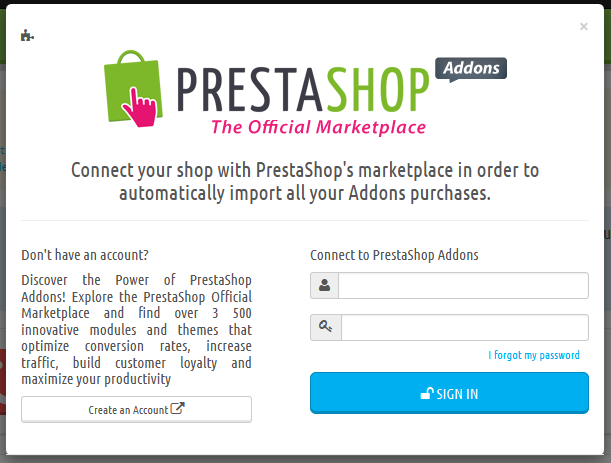
Enter your credentials, click on "Let's go": your installation of PrestaShop is now tied to your Addons account, and will start comparing your local modules with the ones that you got from Addons, making sure to keep each available and up to date!