
In PrestaShop 1.7 the Modules and Services page is divided in three tabs to help you perform easily what you want to do regarding your modules:
- Selection: this is where you can discover and install new modules to improve your store, when you’re beginning or growing with PrestaShop,
- Installed Modules: where you can manage your modules on a daily basis
- Notifications: review modules notifications, when you need to take action (updates or configuration) to guarantee the good functioning of your modules
At the top of the page, you will also find two important features: the connection to Addons and the "Upload a module" option.
Selection
The “Selection” tab is about discovering new modules and service to improve your store. Here you’ll find a list of all the modules you can install (and not the ones you’ve already installed).
This selection of recommended modules is based on your country, language and version of PrestaShop. It includes the most popular modules from our Addons marketplace, and free partner modules.
What is the difference between a module and service?
A module allows you to add features to your shop such as new means of payment, a synchronization of inventory and orders with your logistician, an export to smart shopping guides, and many tools for you and your customers. Modules comes with a file that must be installed within your PrestaShop.
On the other hand, a service is intangible: you do not have to install anything on your shop for the service to work. Instead you may have to sign a contract with the service provider. Services are identified with the "Discover" button.
Searching for a module or service
If you have a specific need and are looking for a module to help you, there are two ways to search for a module:
- Browse the categories. By clicking on "Categories" you will find a list of categories: modules are organized in functional categories, depending on how you want to improve your shop. Do you want to improve its navigation or are you rather interested in implementing some new marketings actions? Once you're done with categories, select "All categories" to reset the selection.
- Use the search bar. If you have a specific need in mind you can aslo type keywords in the search bar, on the right-hand side of the page. For example, if you type in "newsletter", you will find all the modules and services related to newsletter. You can also search modules by module name, or author. To remove a keyword, click on its cross.To reset the search, click on the blue cross at the far right of the bar.
You can use both the search bar and the categories simultaneously, to further narrow down your results.
If your search doesn't give any results, a link invites you to go to Addons marketplace where you will find more modules.
Filtering modules
In addition to the search, you can also sort modules to better find what you need, with these filter:
- Name. Sort modules by their name, from A to Z.
- Increasing price. Show modules with the lowest price first. Free modules will be shown at the top of the list, sorted from A to Z.
- Decreasing price. Show modules with the highest price first.
- Popularity. Sort modules and services according to their rating on Addons. Built-in modules will be displayed first as they do not have any rating available on Addons.
What is a built-in module?
Built-in (or native) modules are available within your shop from its set-up. Some are already pre-installed to help your shop running, while other are available in the "Selection" tab. You can choose to install it or not, depending on your needs. They cover the basics of e-commerce and come for free.
List display
There are two options to choose from to display the list of modules.
- Card view. Each module is displayed in a card, providing more space for information display.
- List view. Each modules is displayed in a row, allowing to display more modules at the same time. You will find the same information as the card view, except for the popularity
By clicking on "Read more" you will find more details on each module or service.
Modules and service information
Each module comes with a set of information to guide you in your choice.
- Module name. The name for the module.
- Module author. The author of the module. "By PrestaShop", is used for both built-in modules or for modules made by PrestaShop and sold on Addons marketplace. "By PrestaShop partners" identifies modules developed by PrestaShop's institutional partners, and they often come for free. Other authors includes individual contributors or agencies whose modules are available on Addons.
- Module version. The version of the module you would be installing.
- Short description. A short sentence to describe the module or service's purpose, and how it can help you
- Popularity. The rating of the module as available on Addons (out of five stars) and the number of ratings.
Actions buttons
Each module or service comes with a action button, to either install the module, buy it, or get more information about it.
Install. For free modules. By clicking on install, the module will get installed in your shop. Once installed, a new menu will appear to manage your module : you can configure, unistall, disable, disable on mobile, or reset the module. Read more about these options in the "Installed Modules" section.
Paying modules
Services
Read more
If the basic information provided are not enough for you to make a decision, you can click on read more to have more details.
Your Modules
The "Modules" page under the "Modules" menu gives you access to the list of modules. On this page you can install, uninstall, configure and update each module. All the native modules are explained in depth in their own chapter, "Making the Native Modules Work". This chapter simply explains how the Modules page works.
Module notifications
Below the page title, you will at times get notifications from installed modules. Most of the time, the notification help you complete the configuration of modules that are installed but are not yet ready to be used: updating their settings should make the notification disappear... and your module work properly.

When one of your module has an update available on the Addons site, PrestaShop will let you know about it, and an "Update all" button will appear at the top of the page. Click on this button to update them all.

The modules list
This list enables you to quickly find the module you want to install or edit the settings of.
The first section is where you can search for a specific module, or filter down modules until you find the one you are looking for.

- Search field. Modules are displayed while you type their name, which makes it even more intuitive and fast.
- Sort selectors. The list automatically reloads when you make a selection, and displays modules according to all the current settings.
- Installed & Not Installed. Most of the time, you will want to perform an action on an installed module, or install a new one. This filter is the most commonly used.
- Enabled & Disabled. Installed module are the only ones that can be configured, hence the importance of this selector.
- Authors. You can filter the modules by author. By default, only "PrestaShop" is available, but as add more modules, this selector will prove very useful.
On the left is a list of all the module categories, with the number of modules for each in brackets. Click on a category in order to display the modules for this category.
One of the categories is named "Favorites" and is empty by default. This enables you to gather the modules you most often use, and to access them quickly. You can set your favorite modules using the "Mark as Favorite" action.
Modules can have one of 4 statuses:
- Non-installed.
- Installed but disabled
- Installed and enabled.
- Installed and enabled, but with warnings.
Some module have a "Popular" badge. This modules are actually from the Addons website. They are not free: the "Install" button is replaced by a shopping cart button, with the price of the module. Clicking that button open the module's page on the Addons website, where you can buy the module.
Difference between disabling and uninstalling
When you do not have a use for a module anymore, you can either disable or uninstall it. The results of both actions are seemingly the same: the module is not available anymore, its options do not appear in your back office and any element it added to your front-end have disappeared.
The difference is that disabling a module keeps its configuration safe for later re-enabling, while uninstalling it removes all of its configuration and database data.
Therefore, you should only uninstall a module if you do not care about its data or if you are certain that you would not need it. If you are really sure you do not want that module on your shop, you can even click on its "Delete" link.
Performing Actions on Modules
Here are the available actions, depending on the module's status:
- Uninstalled modules:
- Install. This will trigger the installation of the module on your installation of PrestaShop. The module will be automatically enabled. It might add new options to your back office.
- Mark as favorite. This will add the module to your Favorites list.
- Installed modules:
- Configure. Some modules have a configuration page. In that case, they offer a "Configure" link to access a new interface where the user will be able to adjust all its settings.
- Disable. When installed, a module is enabled by default. You can disable it, which will remove its options from your back office, but will keep its settings for a later re-enabling.
- Disable/display on mobile. This will disable the front office view of the module only for mobile devices (smartphones, etc.).
- Disable/display on tablets. This will disable the front office view of the module only for tables.
- Disable/display on computers. This will disable the front office view of the module only for desktop computers.
- Reset. This will restore the module's settings to their defaults.
- Uninstall. This will disable the module and delete its data.
- Mark as favorite. This will add the module to your Favorites list.
- Delete. This will remove the module from the modules list, and delete its files and folders from your server.

Top ranking modules from Addons can be promoted to your module list, depending on your country settings. They appear among regular modules, but their action buttons are not labeled "Install" but instead "30 €", for instance. Clicking on the button takes you to the module's Addons page, from which you can log in, buy and download the module. From there on, you can install it on your shop.
Connecting to Addons
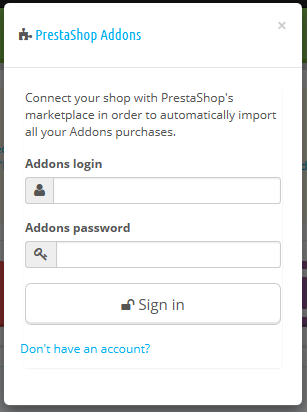
In the basic configuration, the modules' page will only let you update the default modules, the ones that were included in PrestaShop. If you have bought modules on Addons, the PrestaShop marketplace, and you want those to update automatically too, you have to connect your PrestaShop to Addons.
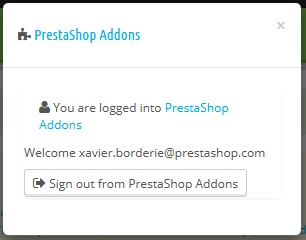
Click on the "Addons" link at the top of the screen: this will open a model window with a log in form. Simply fill in the form with your Addons connection details, and PrestaShop will now know (and update) the modules you have bought. Click on the "Addons" again, and it will display your account login.
 |  |
If the modules you have bought on Addons are not updating, do check that you are connected through this form!
Upload a module manually
Once you have downloaded a module from the Addons online shop to your computer, it is up to you have it installed on your PrestaShop site.
If you haven't linked you store to your Addons account, there are two ways to install a module: either using the dedicated form, or using your FTP client.
Installing using the dedicated form
To install a new PrestaShop module automatically, click on the "Upload a module" button at the top of the page. A pop-up window will open.

This block enables you to upload the archive file of the module, as downloaded from Addons. You can either upload a zip file, or a tar.gz one (tarball). Simply drop the module's file here, or browse to the file that you downloaded by clicking on "select file". Do not point to the module's uncompressed folder or any of its unpacked files: only the archive file!
Once the file is detected, the installation will start automatically: PrestaShop will upload the module from your computer to its server, unpack it, place the files in the correct location, and update the page, all this in a handful of seconds. PrestaShop will then display "Module downloaded successfully".
Modules are not installed by default: you still have to click the module's "Install" button, and then possibly configure its settings via the "Installed modules" tab.
Once configuration is complete, be sure to test the module immediately to confirm that it works as planned.
Installing using a FTP client
You can also choose to install a module by yourself, using a FTP client.
To install a new PrestaShop module manually:
- Unzip (decompress) the module archive file (
.ziportar.gz). This should result in a new folder. - Using your FTP client, connect to PrestaShop web server, and place the unpacked module folder in PrestaShop's
/modulesfolder.
Pay attention NOT to upload that folder in another module's folder (which can happen when drag-and-dropping items). Upload both the folder and the files it contains, not just the files. - Go to your back office, in the "Installed Modules" tab.
- Locate the new module in the modules list. You might have to scroll down; you can also use the list's search engine, which should give you a dynamically updated list of matching module names.
- In the row for the new module, click the "Install" button.
- Your module is now installed and should be activated too. If necessary, click on the module's "Configure" link. Also, pay attention to any warning message that might be displayed by PrestaShop.
Once configuration is complete, be sure to test the module immediately to confirm that it works as planned.
Modules can come from many sources, and not all of them are reliable. This is why PrestaShop may display a warning window for "Untrusted" modules – that is, modules that have not been verified by PrestaShop through its Addons marketplace. This screen window lets you choose whether to proceed with the installation with no further notification, or to stop the installation process.
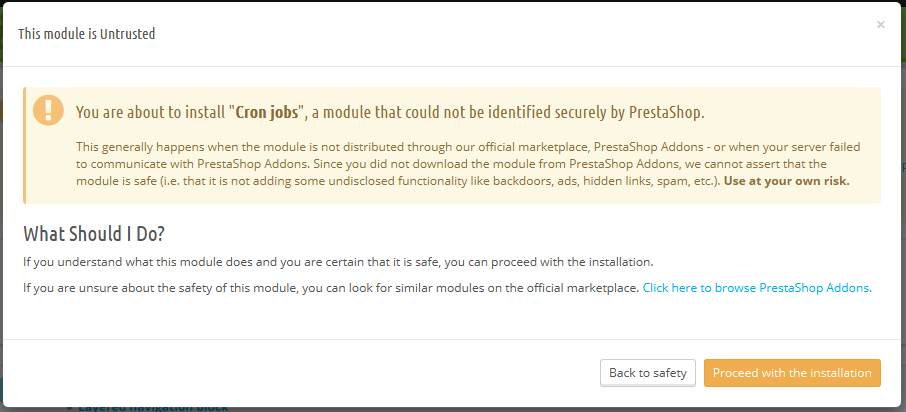
Installing a native module or a module obtained through Addons will not trigger the display of this window.
Connect to Addons Marketplace
PrestaShop Addons is the central marketplace where you can get new modules and themes for your store. Addons users are first-class citizens when it comes to managing modules! Indeed, once you installation of PrestaShop is tied to your Addons account, the modules you get on Addons will automatically be imported installed and updated! This is why it is hightly recommended that you should link your store to your PrestaShop Addons account.
Don't have an Addons account?
Creating an account is free is easy. Click on the 'Connect to Addons marketplace" button, then click on the "Sign up now" link, which will take you here: https://addons.prestashop.com/en/login#createnow
From there you can create a new account and browse among all the modules and themes available on our Addons marketplace.
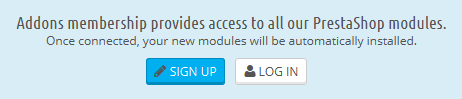
Already have an account?
If you already have an Addons account, click on the "Connect to Addons marketplace" button to open the login window.
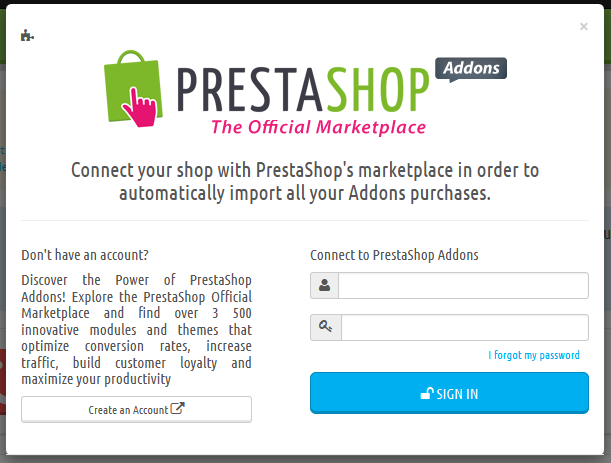
Enter your credentials, click on "Let's go": your installation of PrestaShop is now tied to your Addons account, and will start comparing your local modules with the ones that you got from Addons, making sure to keep each available and up to date!