...
Now that you have installed PrestaShop 1.6 7 and that you are properly logged-in to your administration area, you should make sure to easily find your way through its administration interface, understand its notifications and know where to find one specific bit of information.
| Info |
|---|
The design of the administration area has been completely partially revamped with version 1.6 7 of PrestaShop in order to be more intuitive and ergonomic – as well as working better on mobile devices.While most of the 1.5 pages and options are still where you can expect them to be, it might take some time to get used to it all(like module page and product page for example). The navigation and main menu have also been changed compare to 1.6: while the features are the same, you might find it difficult to locate pages as you used to, at first. The purpose of this redesign is of course to make it easier for merchants to manage their shop. |
We have created this chapter in order to help you make the most of your discovery of PrestaShop's administration interface. It has been designed to be very ergonomic and easy to use, but be aware that you should read the whole guide in order to get a perfect grasp of your new online business tool!
...
At the top of the back office is a black white bar containing a handful of information and links:
- The PrestaShop logo, along with your current version number.
- The name of your shop. From any page, this takes you back to the Dashboard.
- Cart icon. A tooltip indicates the number of new orders, if any. Clicking it opens .
- Quick Access. This is the quick links menu, presenting the most useful links. You can customize it by clicking on "Manage quick accesses".
- Search field with dropdown list. Enables you to search within the content of your shop.
- Debug mode (optional). If you set your shop in Debug mode, an icon will be displayed to remind you it is enabled.
- "Shop name" link. Opens a new browser tab with your shop's front-end.
- Bell icon and number. Indicates the number of new notifications, which by default will show you the last orders.
- Orders. Opens a panel presenting the new orders since you last clicked that icon. From there on, you can either display one of the new orders, or go to the list of orders.
- Customers. Opens a panel presenting the last registered customers. From there on, you can either display one of the new customers, or go to the list of customers.
- Messages. Opens a panel presenting the last customer service message. From there on, you can either display one of the new messages, or go to the list of messages.
"Merchant Expertise" module.- Quick Access. This is the quick links menu, presenting the most useful links, as set in the "Quick Access" page under the "Administration" menu.
- "
Connect to PrestaShop Marketplace account" link. Opens a modal window enabling you to connect your shop to the Addons marketplace, and thus get updates from the modules and themes you bought. - "My shop" link. Opens a new browser tab with your shop's front-end.
- Personal menu named after your first name and surnamewith your profile picture. A simple dropdown panel with a reminder of the administrative account with which you are currently logged-in. It contains the following links:
- "My preferences" link. Takes you to your account's preferences page, where you can set some personal options (for instance, the language of your back office or your password).
- "Sign out" link. Logs you out of the current user account.
...
All along your daily activities administrating your shop, you will have to browse through the many pages and options of the back office.
| Info |
|---|
|
Each menu In PrestaShop 1.7, the menu has been reorganized in three main sections, from the pages you use the most frequently, to the one you open less often. Under these sections, each menu applies to a given set of tasks and contexts:
...
- Dashboard. The homepage of your back office, where you can see the main statistics, live.Catalog. This is the heart of your shop, where you will add products, create categories, set up carriers and suppliers, etc
Sell
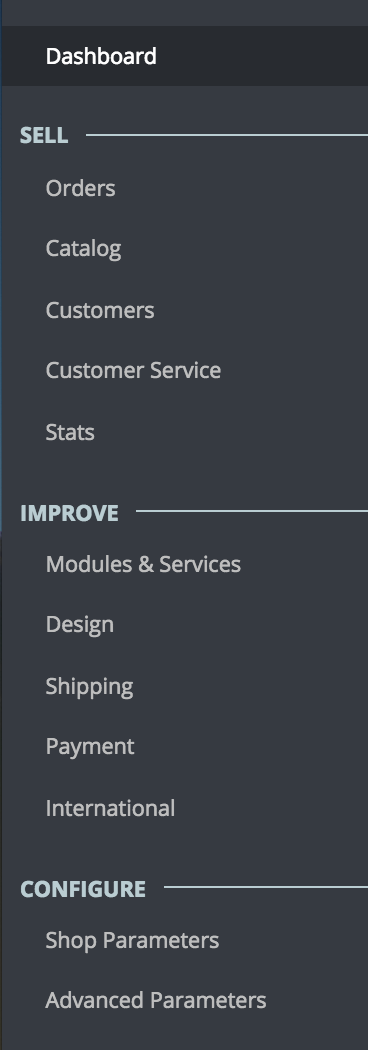
It’s all about your day-to-day activity. Orders, customers, catalog, etc. This section presents the essence of your business, where you go each day to get your business going.
- Orders. Once clients start adding products in their shopping carts, you will see orders in this menu, with the resulting invoices. This is also where you handle merchandise returns, credit credit slips and per-order customer serviceabandoned carts, among other things.
- Catalog. This is the heart of your shop, where you will add products, create categories, set up carriers and suppliers, define discounts etc.
- Customers. Here you can access all the information about your clients, and edit their addresses, create groups of customers to which you can apply special discounts, handle customer service, and even manage social titles if need be.
- Price Rules. A very specific menu, enabling you to easily create vouchers and price reductions through a set of rules.
- Modules and Services. Customer service. Where you handle customer service and anything post-purchase: merchandise returns, per-order customer service, etc.
- Stats. This menu gives you access to all the numerous statistics and graphics that are gathered and generated by PrestaShop.
Improve
Here you will find everything to customize your shop and take your business further. Set up the look of your front office, adapt your payment methods to your target markets, expand internationally or enhance your shop with new modules and features!
- Modules. Extend the power and usefulness of your shop by adding and activating modules: more than a hundred are available by default, and many more are available to buy on the Addons marketplace (http://addons.prestashop.com/). This
- Design. This is also where you handle themes, and where you can position the blocks of content from your module on the theme (including the Live Edit feature). One last menu page enables you to apply global settings to payment modules. More generally this is where you can modify the look of your shop.
- Shipping. Everything pertaining to carriers and shipping costs, as well as marketing.Localization
- . Payment. Select which payment methods are available on you shop and apply global settings to payment modules.
- International. Helps you customize your shop with local values, such as language and translation, currency, units, taxes and tax rules, and geographical entities (regions, countries, etc.).Preferences.
Configure
It is divided in two submenus. The first one is your shop parameters. You’ll find here all the settings you need to configure when you launch your activity. Once you made your initial choices, you won’t go there very often. The second menu can be seen as the technical section, with more advanced settings that aren’t used often either.
- Shop Parameters. PrestaShop is a very configurable e-commerce solution, and you can edit just about any of its behaviors using the these full-featured preferences.
- Advanced Parameters. This menu contains links to tools and informational pages that are too specific to fit in other menus, such as the Web service settings, the database backup tool, or the performance page, among others. Administration. Here are This is also where are the settings pertaining to the back office itself; for instance, the content of the Quick Access menu, the employees list and permissions, or the menu order, among others.
- Stats. This menu gives you access to all the numerous statistics and graphics that are gathered and generated by PrestaShop.Administration.
These are the default menus. Note that modules can add new options to the existing pages, new pages to the existing menus, and even new menus. Some of these menus are further divided in pages with tabs to present you with the variety of features available in PrestaShop.
Also, one menu is only available when the proper option is set:
Stock. This menu gives you access to stock management feature, where you can handle warehouses, stock movement and supply orders.It can be made available through the "Products" preference page: simply activate the "Enable advanced stock management" option (in the "Products stock" section) and save your change to see the menu appear.
All the default standard menus , including the "Stock" menu, are explained in depth in this user guide.
...
| Note | ||
|---|---|---|
| ||
By default, the Dashboard uses fake data so that you can better visualize what the various stats are for. When using PrestaShop for a real online store, you must disable this fake data so that your real data is used: deactivate the "Demo mode" option at the top right of the screen, next to the "Help" icon. |
The header and demo mode
In addition to the contextual help, it also features the "Demo mode" option, from which you can disable the fake data used by default on the Dashboard and use your own data (as gathered by PrestaShop's statistics system).
The horizontal bar
At the top of the Dashboard is a single bar which helps you choose the period of time for the currently displayed dashboard statistics. Three sets of options are available:
...
This last column is an informational one: it gives you the latest news from PrestaShop.com, notifications about new PrestaShop versions, and useful links.
It also features the "Demo mode" block, from which you can disable the fake data used by default on the Dashboard and use your own data (as gathered by PrestaShop's statistics system).
|