Table of contents
| Table of Contents | ||
|---|---|---|
|
Modules and Themes Catalog
PrestaShop comes bundled with a host of more than 100 modules, but even that number might seem limiting, or you could want to explore other directions.
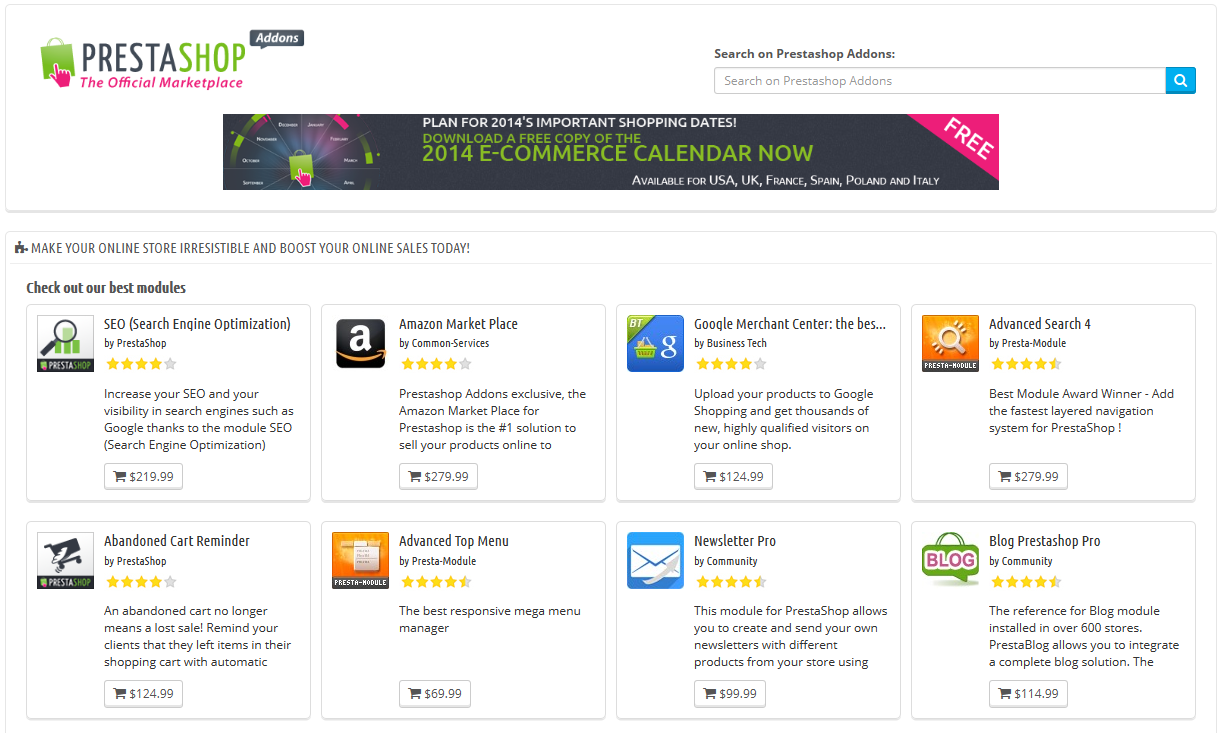
There are many more modules available on the PrestaShop Addons website (http://addons.prestashop.com/). Some are free, others are for-pay, and you are sure to find something that suits your needs! Once you are a seasoned module developer/theme designer, you can even submit your own creations, and sell them on Addons!
...
- A search field, with which you can search the whole content of the Addons website.
- On the right, a "Discover our modules" box features 4 modules chosen among the most downloaded.
...
- A list of 8 modules that you can buy directly.
- A list of 12 themes that you can buy directly.
A search query will send you to the Addons website, where more options are available.
Clicking on an item will open its Addons page in a new browser tab.
| Info |
|---|
Addons is the official marketplace for PrestaShop Modules and Themes. This is where shop owners can get all the necessary items to customize their shop, and where authors can share their creations with the community. Modules and themes can either be free or for-sale: the price is set by the author. Take the time to browse the available modules and themes, because expensive does not always mean better. You must be logged-in before you can download or rate anything. Creating an account is free. |
Installing
...
a module
Once you have downloaded a module from the Addons online shop to your computer, it is up to you have it installed on your PrestaShop site.
...
To install a new PrestaShop module automatically, click on the "Add new module" link at the top of the list of modules, in the "Modules" page. A new section will slide open.

The form in this section enables you to upload the archive file of the module, as downloaded from Addons. You can either upload a zip file, or a tar.gz one (tarball). The form is straightforward: simply browse to the module's file that you downloaded, and click the "Upload this module" button. Do not point to the module's uncompressed folder or any of its unpacked files!
| Info |
|---|
In previous version of PrestaShop, you could upload the module's zip file on your FTP server and point the form to that file's URL. |
: only the archive file!
Once you have clicked the button, PrestaShop will upload the module from your computer to its server, unpack it, place the files in the correct location, and update the page, all this in a handful of seconds. PrestaShop will then display "Module downloaded successfully".
...
- Unzip (decompress) the module archive file (
.ziportar.gz). This should result in a new folder. - Using your FTP client, connect to PrestaShop web server, and place the unpacked module folder in PrestaShop's
/modulesfolder.
Pay attention NOT to upload that folder in another module's folder (which can happen when drag-and-dropping items). Upload both the folder and the files it contains, not just the files. - Go to your back - office, in the "Modules" menu.
- Locate the new module in the modules list. You might have to scroll down; you can also use the list's search engine, which should give you a dynamically updated list of matching module names.
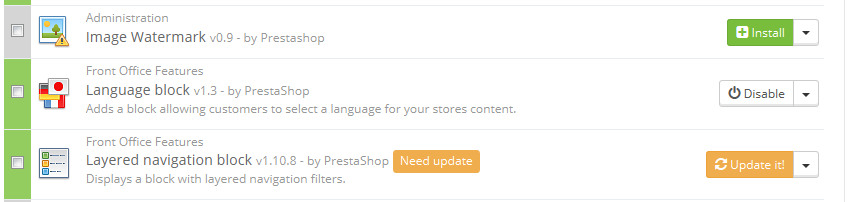
- In the row for the new module, click the "Install" button.
- Your module is now installed and should be activated too. If necessary, click on the module's "Configure" link. Also, pay attention to any warning message that might be displayed by PrestaShop.
Once configuration is complete, be sure to test the module immediately to confirm that it works as planned.
| Warning |
|---|
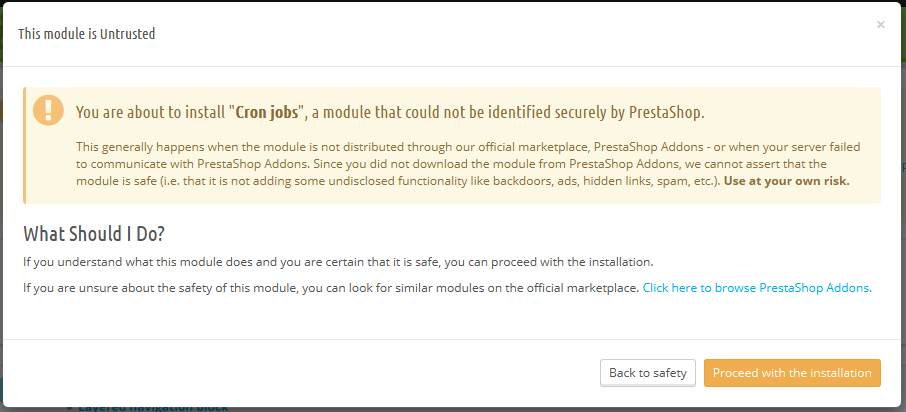
Modules can come from many sources, and not all of them are reliable. This is why PrestaShop 1.6.0.7 introduced a warning window for "Untrusted" modules – that is, modules that have not been verified by PrestaShop through its Addons marketplace. This screen window lets you choose whether to proceed with the installation with no further notification, or to stop the installation process.
Installing a native module or a module obtained through Addons will not trigger the display of this window. |
Updating a module
Your PrestaShop installation regularly checks with the Addons server if there is any update for your modules. If so, PrestaShop displays a "Update it!" link for the affected modules. Simply click it, and PrestaShop will take care of downloading and updating the module.
Uninstalling a module
| Warning |
|---|
Do not ever delete a module by directly trashing its folder using your FTP client! You must let PrestaShop take charge of it. |
...
| Tip |
|---|
Make sure that the disabling or removal of the module does not break the theme. |
Installing a theme
Once you have downloaded a theme from the Addons online store, it's up to you have it installed on your PrestaShop site.
Installing using
...
PrestaShop's theme installer
This is the recommended method, as it preserves all the blocks' positions on their respective hooks.
The "Import/export a theme" module is a native module, and should be installed by default. This is a special module that enables you to import a theme and install it (and its attached modules), or to export a theme and its modules from your shop in order to share it with the world.
Find this module in the module list (in the "Modules" page), and open its configuration screenPrestaShop has a native theme importer, which you can reach from the "Themes" page, under the "Preferences" menu. Click the "Add new theme" button at the top of the screen (not the "Add new" button above the list of themes, which is used to create a new theme). This screen presents you with 3 methods to install (or "import") a new module: from your computer, from a public website, or from your own FTP server. It also gives you a method to export your module in a correct formatcreate a new theme from scratch.
Importing a theme
Whatever the method, the process remains the same: indicate the location of the theme's Zip archive, then click "Next".
...
Click "Next" one last time. A final confirmation page presents you with all the changes applied to your PrestaShop site. Click "Finish" to end the process.
Exporting a theme
This section is only available when there is at least one theme installed on your PrestaShop site.
Exporting a theme is very useful when you want either to back the theme up for safety, and create an archive of the theme for a friend or in order to make it available on the Addons marketplace (http://addons.prestashop.com/). Not only does it generate a complete Zip archive of your theme, but it also adds many information in an XML files, which is very useful both when uploading to Addons, and when importing to another PrestaShop site.
Select a theme and click on "Export this theme". A configuration form appears where you can set the exported themes parameters: author, theme name, compatibility version, attached modules (if any), etc.
Once all the parameters are correctly set, click on "Generate the archive now". You will quickly get a file to download from your browser. Save it on your hard-drive, then give the save file a proper name. From there on, you can easily share this theme, and if it is your own creation, you can start selling it on PrestaShop's Addons website at http://addons.prestashop.com/.
Installing using a FTP client
This method is not recommended, but is still available. Use with caution: your blocks might not have the expected position on their respective hooks.
...
- Unzip (decompress) the theme archive file (
.zip). This should result in at least one new local folder,/themes, containing your theme's folder(s). - Using your FTP client, place the theme's folder (as found in the local
/themesfolder) online in your PrestaShop/themesfolder. Pay attention NOT to upload that folder in another theme's folder (which can happen when drag-and-dropping items). Upload the whole folder, not just the files it contains. - (optional) If the theme's archive contains a second
/modulesfolder, it means your new theme comes bundled with modules that are specific to it, or necessary for it to run properly. Using your FTP client, place the folder(s) found in the local/modulesfolder online in your PrestaShop/modulesfolder. If your online PrestaShop install already has a module of the same name, try to only keep the most recent version of the two (the one with the most recent files). If unsure, keep the version bundled with the theme, as it is the most likely to work best with it. - Go to your back - office, in the "Themes" page under the "Preferences" menu.
- Select the new theme in place of the current theme, by clicking on the radio button then clicking "Save".
- Your theme is now in place.
- (optional) If the theme came with modules, activate them on the back - office's "Modules" page, then configure them if need be.
...
Once configuration is complete, be sure to test the theme immediately, every page of it, to confirm that it works as planned. Do try to make a full order, from A to Z – you wouldn't want to miss orders just because you didn't notice the theme was incomplete!
Exporting a theme
Exporting a theme is very useful when you want either to back the theme up for safety, and create an archive of the theme for a friend or in order to make it available on the Addons marketplace (http://addons.prestashop.com/). Not only does it generate a complete Zip archive of your theme, but it also adds many information in an XML files, which is very useful both when uploading to Addons, and when importing to another PrestaShop site.
Just as for theme importation, there are two ways to export a theme: using PrestaShop's own exporter, or using the one from the Theme Installator module:
- PrestaShop's exporter: click on the "Export theme" button at the top of the "Themes" page (in the "Preferences" menu).
- Theme Installator's exporter: open the module's configuration page, then go to the "Export a theme" section.
Select a theme and click on "Export this theme". A configuration form appears where you can set the exported themes parameters: author, theme name, compatibility version, attached modules (if any), etc.
Once all the parameters are correctly set, click on "Generate the archive now". You will quickly get a file to download from your browser. Save it on your hard-drive, then give the save file a proper name. From there on, you can easily share this theme, and if it is your own creation, you can start selling it on PrestaShop's Addons website at http://addons.prestashop.com/.
PrestaShop's mobile template
The mobile template enables any PrestaShop merchant to have his or her shop be accessible to mobile devices: from the home page to the payment process, along with product pages and conversion funnel.
...
- Connect to you PrestaShop's administration.
- Go to the "Themes" page under the "Preferences" menu.
- In the "Appearance" section, go to the "Enable mobile theme" part and choose one of the three options other than "I want to disable it".
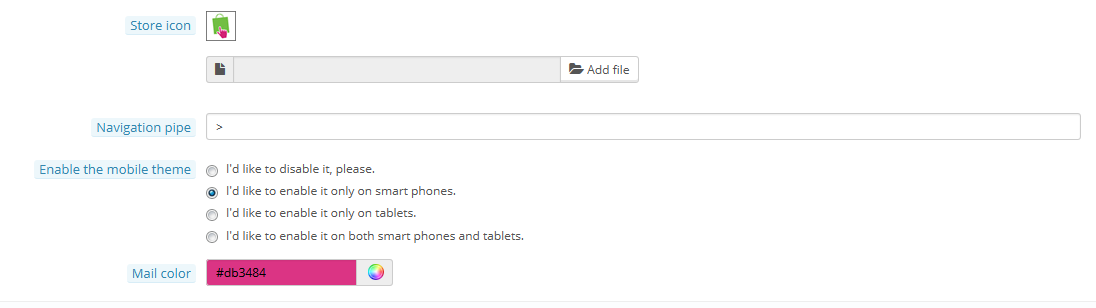
By default, the mobile template is only used for mobiles phones, tablet receiving the same theme as regular devices. With this option, you can choose to have the mobile template be used for tablets ("Both" option"), or even choose to only have it used for tablets (mobile phones receiving the regular theme).
...